
English 

+86-158-5501-9595
leizhang112@126.com
leizhang112@126.com
No. 8, Lanzhou Road, Su-Chu Modern Industrial Park, Chuzhou City, Anhui Province


Views: 0 Author: Site Editor Publish Time: 2026-10-28 Origin: Site


Manufacturing a highly efficient refrigerator requires extreme precision, yet one hidden enemy often sabotages the process: cured polyurethane residue. Plant managers, manufacturing engineers, and procurement specialists know the stakes all too well. Cured PU foam buildup on mold surfaces quickly disrupts parting line seals. This causes severe cabinet deformation and spikes daily defect rates. Moreover, leaving tooling improperly stored invites rapid corrosion and irreversible dimensional warping. You end up wasting capital and losing valuable production time to unexpected downtime.
We need a robust, evidence-based standard operating procedure to protect these expensive assets. This comprehensive guide outlines exactly how to clean and properly store your critical injection tooling. We will explore proven maintenance protocols to prevent catastrophic polymer bonding. You will learn how to choose the correct cleaning methods, implement active storage techniques, and preserve consistent thermal insulation quality across your entire production run.
Routine beats remediation: Inline, shift-based cleaning of PU foaming fixtures prevents catastrophic polymer bonding and costly offline scraping.
Method selection matters: Choosing between chemical solvents and dry ice blasting depends on your facility’s safety compliance, cycle time constraints, and tooling tolerances.
Storage is an active process: Proper preservation requires specialized anti-rust treatments, hydraulic system isolation, and climate-controlled environments to prevent microscopic warping.
Data-driven replacement: Tracking maintenance hours versus scrap rates is the most reliable indicator of when a mold requires refurbishment or replacement.
Micro-layers of residual PU foam act as unwanted thermal insulators during the exothermic curing process. Polyurethane relies on a precise chemical reaction. It generates heat to expand and fill the cavity. When old residue coats the mold walls, it disrupts this delicate temperature distribution. The new foam cures unevenly. You compromise the structural integrity and thermal efficiency of the appliance.
This neglect has a cascading impact across the entire cabinet PU foaming line. We primarily see two major consequences:
Dimensional Instability: Hardened residue prevents the mold from closing fully. Even a millimeter gap at the parting line leads to flash and foam leakage. You produce out-of-tolerance refrigerator cabinets. These defects require manual trimming or complete scrapping.
Cycle Time Degradation: Unclean surfaces strip away the release agent. Sticking parts refuse to eject smoothly. Operators must intervene manually to pry the cabinets free. This slows down your automated rhythm and destroys daily throughput metrics.
To evaluate your current maintenance protocol, you must establish clear success criteria. A successful operation reduces unexpected downtime to near zero. It maintains consistent release agent consumption. Ultimately, it ensures zero cabinet surface defects. The chart below illustrates the stark contrast in operational metrics.
Operational Metric | Proactive Cleaning Routine | Neglected Maintenance |
|---|---|---|
Parting Line Seal | Flush closure, zero flash | Gaps present, heavy foam leakage |
Cycle Time | Predictable automated ejection | Extended delays for manual prying |
Scrap Rate | Less than 1% | Spikes up to 15% due to voids |
Tooling Lifespan | Maximized across planned cycles | Premature degradation and warping |
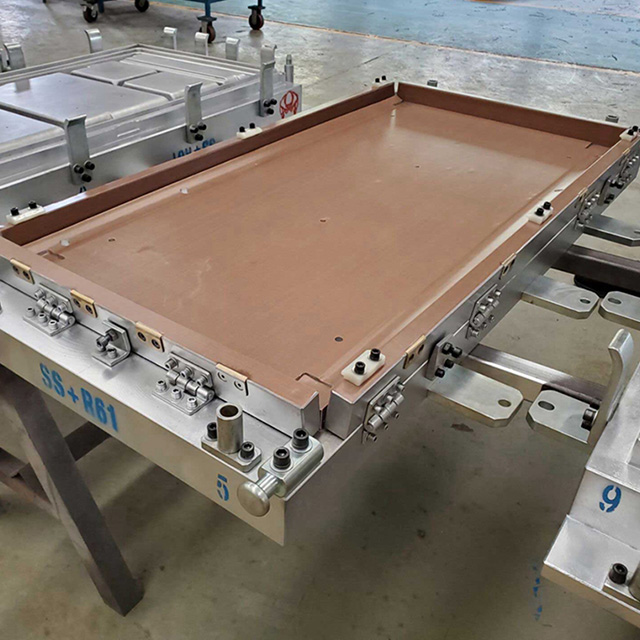
Cleaning a PU Foaming Mold requires a systematic approach. You must separate maintenance into daily inline tasks and offline deep cleaning procedures. This dual approach prevents minor buildup from becoming a permanent polymer bond.
Operators must perform basic maintenance without removing the tooling from the press. Shift-based attention catches problems early.
Visual Inspection: Operators examine parting lines and injection ports. They look for micro-flash or wet foam residue. Catching a small leak here prevents a massive blowout later.
Surface Wiping: Use non-abrasive industrial wipes. Operators gently wipe down residual release agent and uncured foam. Never use dirty rags. Dirty rags introduce debris into the mold cavity.
Clearing Vents: Vents allow gas escape during the injection phase. Blocked vents cause trapped air pockets, leading to large voids in the cabinet insulation. Operators must ensure these micro-channels remain completely unobstructed.
Eventually, every mold requires a comprehensive reset. You pull the tooling offline to address hidden contamination.
Safe Decoupling: Technicians safely decouple the mold from the carrier or press. They follow lockout/tagout procedures to ensure zero kinetic energy remains active.
Systematic Removal: Teams address cured foam trapped in complex geometries. They focus heavily on corners, undercut areas, and complex contours. These zones accumulate the most stubborn residue.
Channel Inspection: Technicians inspect the internal heating and cooling water channels. Hard water causes scale buildup over time. Scale acts as an internal insulator. It severely affects the mold temperature control system, causing unpredictable curing times. Descaling these lines restores thermal efficiency.
Selecting the right cleaning method balances aggressive removal against the risk of permanent tooling damage. Facilities usually rely on three primary methods to maintain a PU Foaming Fixture.
Chemical solutions often utilize Methylene Chloride or NMP alternatives to break down molecular bonds.
Pros: Solvents excel at dissolving fully cured polyurethane. Liquids easily flow into internal crevices and tight parting lines where physical tools cannot reach.
Cons/Risks: These chemicals emit high volatile organic compounds (VOCs). They require strict worker safety compliance, including respirators and specialized ventilation. Additionally, harsh solvents degrade non-metal seals and O-rings prematurely.
Dry ice blasting represents the modern industry standard for precision injection tooling.
Pros: This process remains completely non-abrasive. It cleans via kinetic energy and rapid thermal shock. The dry ice pellets sublimate instantly upon impact. You generate zero secondary waste. Technicians can often perform this cleaning while the mold remains hot and in the press.
Cons/Risks: This method carries a high initial equipment cost. It also requires a robust, consistent compressed air supply and adequate facility ventilation to displace the resulting CO2 gas.
Operators physically scrape away the buildup using brushes and hand tools. However, you must exercise extreme caution here.
E-E-A-T Warning: Never allow operators to use hardened steel tools, screwdrivers, or aggressive wire wheels on precision mold cavities. Hardened steel easily gauges aluminum and mild steel surfaces. These micro-scratches act as permanent anchor points for future PU adhesion. Once you scratch the cavity, the foam grips tighter every cycle. You permanently degrade the mold performance. Only permit soft brass scrapers or specialized plastic spatulas.
Storage represents an active phase of asset management. You cannot simply leave a refrigerator PU foaming mold on a warehouse floor and expect it to perform flawlessly next year. Proper preservation requires specific protocols.
You must address residual moisture before storage. Ensure 100% moisture and solvent removal from all surfaces. Wipe the cavity completely dry. Next, apply an industrial-grade, heavy-duty anti-rust preventative. Standard penetrating oils like WD-40 evaporate too quickly for long-term storage. You need a specialized waxy or viscous film designed for bare metal cavity surfaces.
Tension and internal fluids cause silent damage over months of inactivity.
Retract Components: Retract all core pulls and ejector pins. Leaving these components extended subjects the tooling to tension-induced warping and stress fatigue.
Drain Circuits: Drain and blow out all temperature control circuits using compressed air. Leaving stagnant water or thermal oil inside the channels invites internal galvanic corrosion. Rusty channels restrict flow and destroy your temperature uniformity when you resume production.
The physical storage environment dictates the survival of your tooling.
Store molds closed to protect the delicate cavity surfaces from dust and accidental impacts. Use dedicated spacing blocks if recommended by the manufacturer to prevent seal crushing.
Avoid storing tooling directly on concrete floors. Concrete holds moisture and transfers thermal shock.
Use rated, heavy-duty racking systems located in a humidity-controlled zone. Consistent ambient temperature prevents micro-condensation from forming inside the mold.
Every facility eventually faces the decision to repair or replace aging fixtures. You must evaluate tooling end-of-life using objective dimensions.
Parting Line Wear: Watch your clamp tonnage. When foam flashing occurs despite applying maximum hydraulic clamping force, the sealing edges are permanently compromised. You cannot simply squeeze a worn mold harder to fix a damaged parting line.
Surface Degradation: Inspect for pitting or widespread scratching. If operators must apply excessive release agent just to eject a part, the cavity micro-finish is failing. This wastes chemical consumables and increases cycle times.
Heating/Cooling Inefficiency: Track your temperature recovery. Irreversible scaling in internal channels extends cycle times beyond acceptable margins. When you cannot descale the lines effectively, the mold becomes a production bottleneck.
Move away from emotional maintenance decisions. Establish a rigid tracking matrix for all maintenance costs. Log every hour spent scraping, descaling, and repairing. Compare these figures against your line's scrap rate. If your combined cleaning and repair hours exceed the amortized cost of a new, higher-efficiency fixture, stop repairing. Initiate the procurement evaluation phase immediately.
Cleaning and storing a refrigerator PU foaming mold is not just basic housekeeping. It remains a critical quality control and asset management function. Precision maintenance protects your capital investment and ensures predictable daily throughput.
As polyurethane formulations evolve rapidly, manufacturers introduce faster-curing and eco-friendly blowing agents. These modern chemicals demand higher precision. The tolerance for mold contamination decreases every year. Facilities must transition away from reactive offline scraping. You must embrace proactive, non-destructive cleaning methods like dry ice blasting to stay competitive.
Take action today. Evaluate your current foaming line scrap rates. Consult your internal tooling engineers to audit your existing mold maintenance standard operating procedures. If your current tools cost more to maintain than they generate in reliable production, it is time to spec a replacement fixture.
A: The stripping frequency depends heavily on your production volume and the specific release agent chemistry. Sacrificial agents build up faster than semi-permanent formulas. Generally, facilities need to strip the microscopic buildup every few thousand cycles. Failure to perform this routine chemical stripping causes "mold fouling," which alters the cabinet's final dimensions and traps gases during injection.
A: No, dry ice blasting does not damage tooling surfaces because it remains completely non-abrasive. The process removes polyurethane using kinetic energy and rapid thermal shock. The dry ice pellets sublimate upon impact, gently lifting the residue away. This method preserves the underlying metal's micro-finish perfectly, making it the preferred industry standard for precision injection equipment.
A: Foam leakage typically results from a combination of three factors: residual foam obstructing the parting line, permanently worn mold seals, or inadequate hydraulic clamping force. Hardened residue physically prevents the two halves from closing. Implementing a strict, daily inline cleaning schedule directly mitigates the accumulation of residue and protects the mold seals from premature crushing.


